
Dog House with Porch: A Practical Build and Site Guide
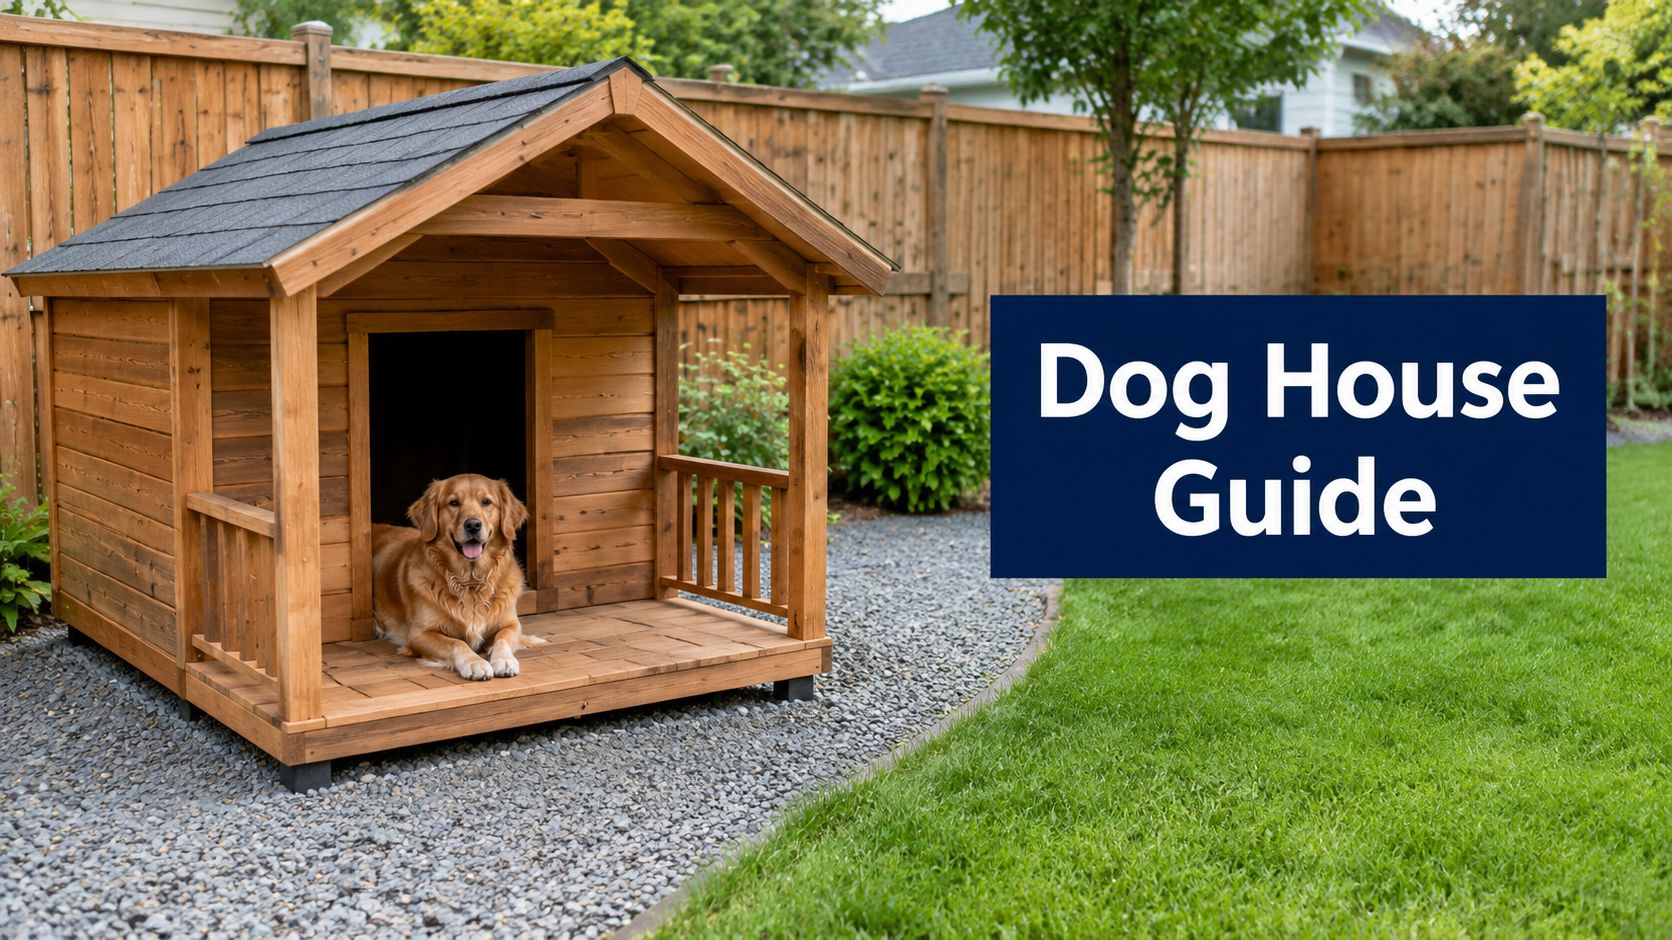
You've built a handsome dog house with porch, set it in the backyard, and expected your dog to settle in. Instead, the bedding stays damp after rain, the yard turns soft around the skids, and your dog keeps choosing the back step. The lumber may be sound, but the structure is failing where many homeowners never look, at the ground.
A durable shelter needs more than a charming roofline. The pad, drainage, elevation, and floor assembly determine whether the house stays dry and comfortable through a Mid-Atlantic winter. The same site-preparation decisions that protect a shed foundation or gazebo foundation also protect a small dog shelter.
Why Most Outdoor Dog Shelters Fail Before the Wood Does
A dog house can have quality siding, tight framing, and a well-built porch roof, yet still become unusable when it sits low on a wet yard. Water collects against the skids, splashes beneath the walls, and works into the floor assembly. Once moisture reaches the bedding, the dog has little reason to use the shelter.
The problem usually begins with poor elevation. A flat, low-sitting pad gives runoff nowhere to go, while soil contact keeps the underside damp. That moisture reaches the sill plate and floor sheathing first, so rot can begin even when the visible framing still looks solid.
The ground controls the shelter
Freeze-thaw movement creates another failure point. If the soil or gravel base wasn't cleared and compacted properly, water enters loose pockets, freezes, and pushes the support unevenly. The small structure may rack, the porch may pull away from the main frame, and doors or flaps can stop fitting.
A dog house with porch also creates a larger roof and drip area than a basic shelter. That extra coverage is useful for shade and a dry transition zone, but it directs more water toward the ground. The pad needs to extend beyond the walls and porch drip line so runoff doesn't fall directly beside the structure.
Practical rule: If the floor stays wet, adding nicer siding or decorative trim won't solve the problem. Correct the base first.
The architectural idea behind a porch shelter is older than modern backyard products. The American dogtrot house, a 19th-century frontier form, used a passage between enclosed rooms and often added a porch across the front or rear. Historical descriptions of the dog-run identify a cooling passage that could be 10 to 15 feet wide, with the porch extending shaded space and helping protect people and animals from heat. The design spread from Alabama to Ontario and had European antecedents, as documented by the Texas State Historical Association's history of dog-run houses.
That history matters because a porch works best as functional shelter, not decoration alone. Shade, airflow, and protection from rain only help when the structure sits on a dry, stable, well-drained base.
Choosing the Right Base for a Dog House With Porch
Three foundation approaches make practical sense for a small outdoor shelter: a concrete pad, a compacted gravel base, and a paver block platform. The right choice depends on soil, drainage, access, and whether you want a quick removable platform or a permanent piece of flatwork.
A small concrete pad gives the stiffest surface and the cleanest floor-to-ground interface. It works well on a flat clay yard where water tends to linger, but it requires excavation, forms, reinforcement decisions, finishing, and careful drainage planning. Concrete costs more than a basic gravel base, and repairs or relocation are less convenient.
A compacted gravel base drains readily and tolerates small surface irregularities better than a slab. It suits a sloped lawn or a site that needs fast drainage, provided the aggregate is installed over firm soil and contained with edging. Without edging, gravel can migrate beneath the porch and leave low spots.
Pavers split the difference. They're modular, easy to replace, and provide a dry platform when installed over a properly compacted base. They can shift when the sub-base is loose, especially where water repeatedly enters the edges.
| Foundation Type | Approx. Cost | Drainage | Install Difficulty | Best Site Match |
|---|---|---|---|---|
| Small concrete pad | Higher material and forming cost | Controlled surface runoff | Moderate | Flat clay yards or permanent placements |
| Compacted gravel base | Lower than a formed slab | Excellent when properly graded | Moderate | Sloped lawns and wet sites |
| Paver block platform | Mid-range, depending on pavers | Good through joints and edges | Moderate | Tight side yards and removable platforms |
For scale, light shed slabs are commonly planned at 4 to 5 inches, with 4 inches for light sheds and 5 inches for heavier storage or riding equipment, according to residential concrete slab guidance from ConstructionCalc. A dog shelter may not require the same construction as a shed, but that comparison helps frame the difference between a decorative platform and a properly prepared foundation.
Homeowners searching for gravel shed foundation contractors near me, shed foundations near me, or concrete contractors should ask how the crew will handle soil removal, compaction, edge restraint, and water movement. A dog house may be small, but the ground beneath it still needs a deliberate design.
Preparing the Site So Water Has Somewhere to Leave
Start by marking the dog house and porch footprint with stakes and string. Leave at least a foot of clearance beyond the structure on all sides so the roof drip line doesn't discharge directly against the edge of the foundation. That extra working room also gives you space to inspect the lower walls and remove wet leaves.
Strip away sod, roots, and organic debris before placing gravel or forms. Buried grass and roots decompose, lose volume, and create soft pockets. Those pockets become settlement points under the floor and can leave one corner of the porch lower than the rest.
Check the grade before bringing in material
Use a long, straight board and a spirit level to check the exposed soil. Your eye can miss a shallow depression, especially across a small yard that looks level from the house. A board gives you a more reliable reading across the actual footprint.
Compact the exposed soil with a hand tamper for a very small area or a plate compactor when the excavation is larger. The objective isn't to pound loose soil endlessly. It's to create a firm working surface that won't accept the base unevenly after the shelter is installed.

A gentle drainage grade should carry water away from the structure. The planned slope in this guide is roughly one inch per four feet away from the shelter. That passive pitch matters more than adding a gutter to a small porch roof because it moves water away from the base before it reaches the wall line.
For a broader explanation of the work involved, the shed site preparation guide is a useful reference for marking, clearing, excavation, and base preparation. If the yard is saturated, tightly confined, or difficult to access, an excavation contractor can confirm whether the issue is surface runoff or a deeper drainage problem.
Before setting the foundation, walk the area after rain if possible. Look for water that sits against the uphill side, flows toward the porch, or disappears beneath the proposed pad. A dry, firm, outward-sloping site gives the selected base a chance to perform.
Framing the Main House and the Porch Roof
The main shell and porch roof have different jobs. The house frame protects the sleeping compartment, while the porch frame carries weather exposure and manages runoff. Treating them as separate decisions produces a stronger result than choosing every board for appearance.
Main house framing choices
For outdoor use, pressure-treated 2×2 or 2×4 studs are a practical choice at the lower frame and sill because splash-back is most severe there. Exterior-grade OSB or 3/4-inch plywood adds rigidity that the studs alone can't provide, especially when the dog leans against the walls or the porch transfers movement into the shell.
Siding should reflect how the dog uses the shelter. T1-11 plywood panels install quickly and provide a straightforward exterior surface. Cedar lap siding offers a traditional appearance. Board-and-batten can work well when the frame is square and the joints are protected. If the dog chews corners, select the material and trim profile with maintenance in mind rather than paying for details that will be damaged.
Porch roof geometry
A shed-style single-slope roof is usually the simplest choice. It directs water away from the entry and keeps the porch framing independent from the main roof. A gable extension can shed snow more effectively, but it requires more cutting and careful connection to the main structure. A flat overhang may cost less to frame, but it demands dependable waterproofing and shouldn't be treated as a flat surface.
For porch spans, 2×4 rafters can handle four-foot overhangs in mild climates, while 2×6 rafters carry wider spans and heavier snow. Those dimensions come from the provided DIY framing guidance, but local snow, wind, span, and connection requirements still matter. A contractor should verify the design rather than assume a small roof is automatically lightly loaded.
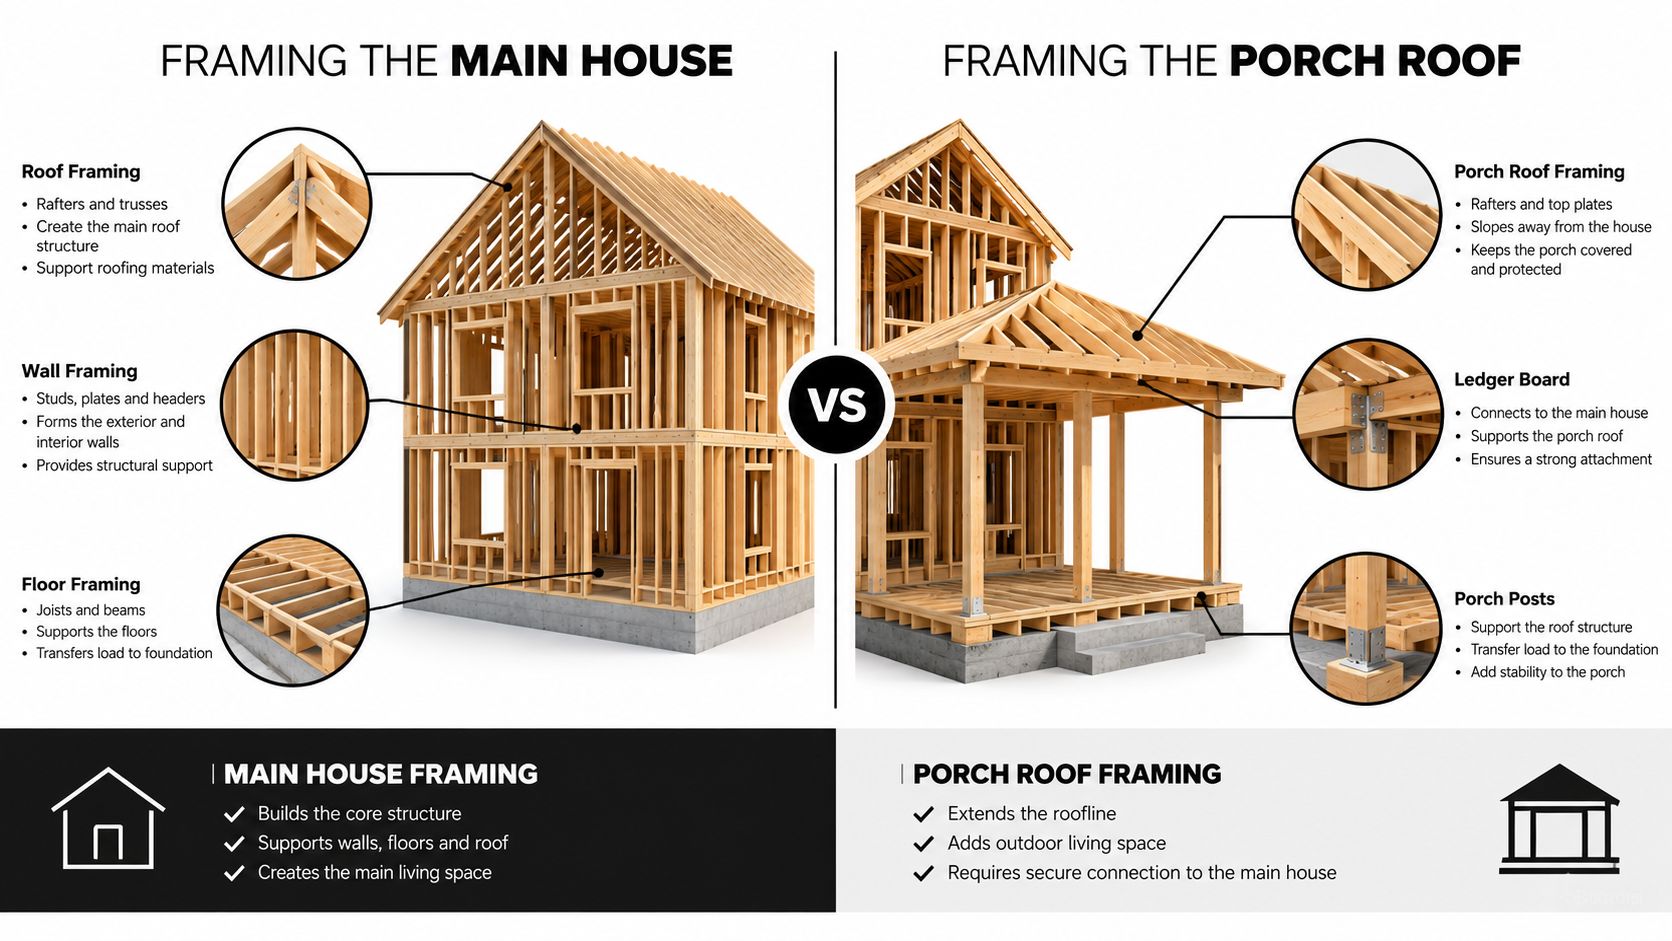
Square cuts, predrilling, and exterior screws in the 3-inch to 3 1/2-inch range help control racking and joint movement under weather cycling, as shown in the Habitat for Humanity doghouse plans. For homeowners comparing porch construction with larger outdoor additions, the Barefoot Organics cost breakdown offers useful context about how framing, roofing, and site conditions affect porch work.
Insulation, Ventilation, and Raising the Floor Off the Ground
A porch can make a dog house look finished, but insulation and floor elevation control comfort. A dog loses heat through a cold floor by conduction, and a damp floor compounds that loss. Decorative brackets can't correct a floor that sits directly against a wet pad.
Raise the floor so air can move beneath it and splash-back can't reach the sheathing. Technical guidance for insulated dog cabins recommends a raised timber grate 50 to 80 millimeters above ground, which is approximately 2 to 3 inches, and identifies the floor as the largest heat-loss path. The same guide recommends PIR insulation with thermal conductivity around 0.022 W/(m·K), using approximately 40 to 50 millimeters in the floor, 30 to 40 millimeters in the walls, and 40 to 50 millimeters in the roof. See the insulated dog house porch guidance for that assembly approach.
Keep the sleeping area protected
Rigid foam such as XPS or polyiso suits a small shelter better than exposed fiberglass because it tolerates incidental moisture and adds stiffness beneath the floor sheathing. Seal the insulation inside the assembly so the dog can't chew it.
Ventilation needs to be controlled, not wide open. A low intake and a vented upper gap can release humid breath while keeping the air movement above bed level. The porch should remain open and uninsulated, acting as a transition area between the weather and the sleeping compartment.
The entrance flap also matters. The technical guidance recommends a vestibule or flap length approximately equal to the dog's body length to reduce drafts. In a porch design, that buffer can be created through the porch opening and the main doorway, but the inner compartment still needs a close-fitting entrance.
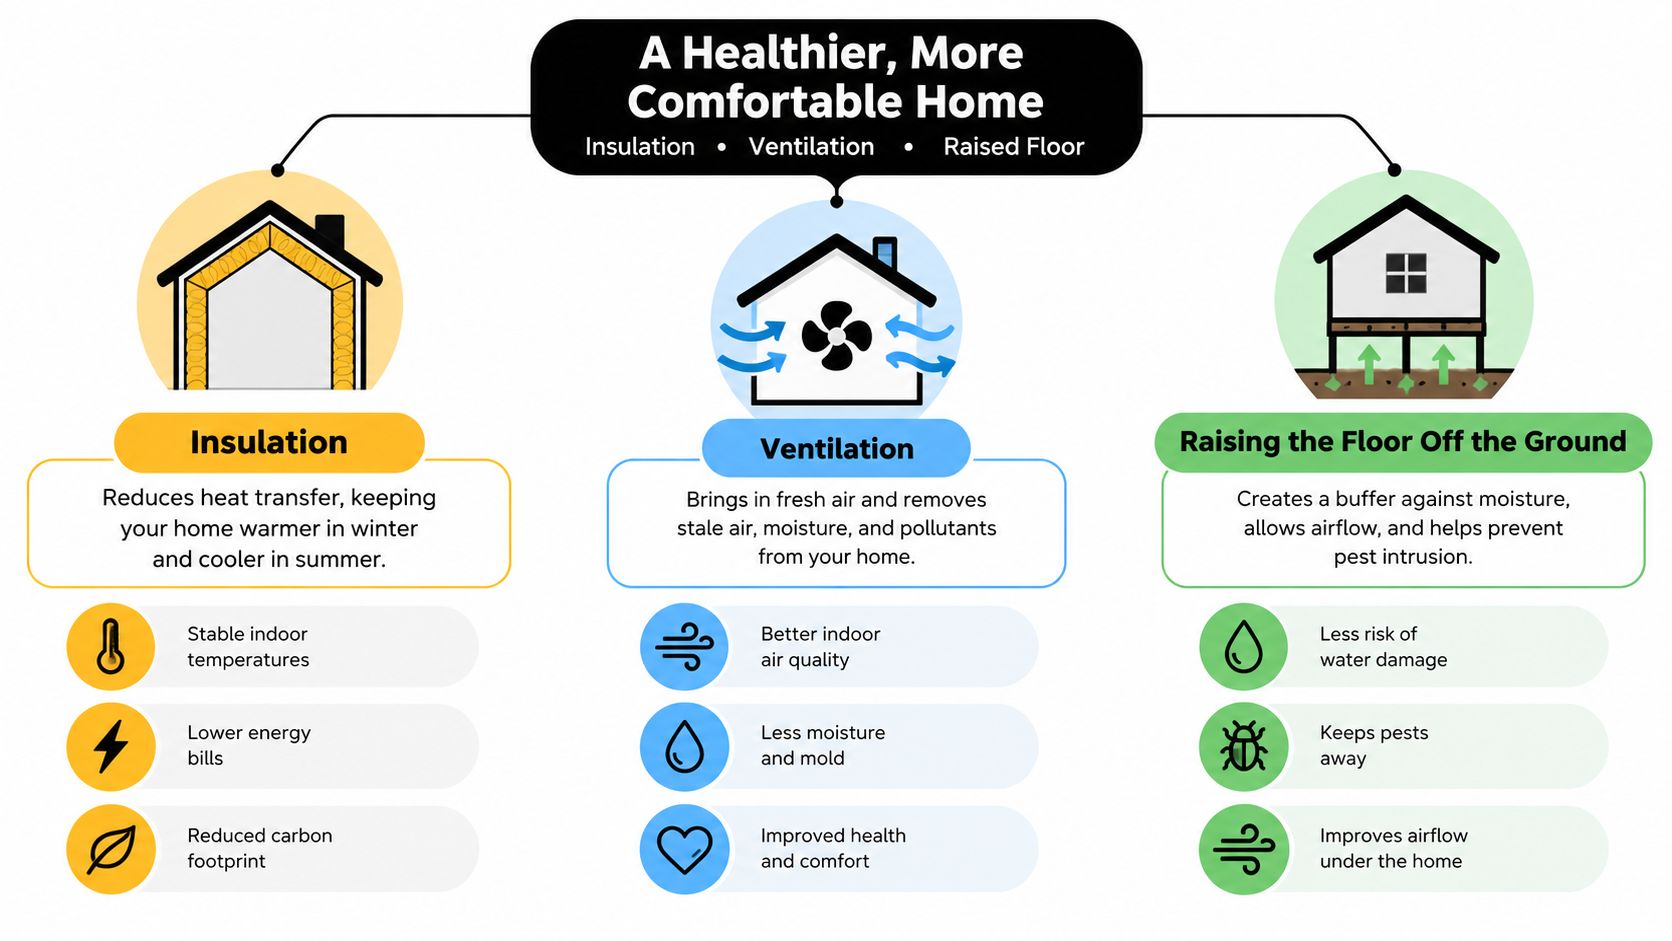
For ideas about integrating pet comfort with usable outdoor design, Nandog Pet Gear's design advice provides a helpful perspective. The practical takeaway is simple: protect the sleeping zone, ventilate without creating a bed-level draft, and give the floor a dry air gap.
If you're also insulating a nearby shed or outbuilding, the guide to choosing insulation for sheds explains how moisture and thermal performance affect small structures. The same principles apply here, although the dog house needs additional attention to chew resistance and safe interior finishes.
Putting It All Together on Build Day
Build day starts with the base, not the roof. Recheck the pad with a level before unloading the frame. If a gravel area has settled or a paver has shifted, correct it before the floor platform hides the problem.
Assemble the floor platform first. Set the rim joists, place the floor joists on 16-inch centers, and install the floor sheathing while the assembly is still easy to reach. Measure the diagonals to confirm the deck is square. Every wall and porch connection depends on this first rectangle staying flat.
Keep the main shell independent
Stand the four wall frames on the platform and fasten the bottom plates through the rim. Add diagonal bracing before installing the porch header. The temporary braces keep the walls from leaning while you check plumb and confirm the doorway dimensions.
Frame the porch roof as a separate shed or small gable assembly, then tie it back to the main wall top plate with joist hangers or properly designed connectors. This approach reduces the chance that a porch adjustment will pull the sleeping compartment out of square.
Build-day check: A porch should add shelter without becoming the device that holds the main house together.
Install the exterior sheathing, wrap the walls with housewrap, and attach the siding. Add roofing felt or another suitable underlayment before the finished roofing material. Keeping the roof weather-tight early protects the interior while you complete trim, porch decking, and the entrance.
Check the wall lines, roof slope, porch projection, and base anchors. Fasten the structure to the pad or platform so wind and repeated movement can't shift it. Let the dog inspect the porch before applying paint or stain, then use an exterior finish that is appropriate for a pet-accessible structure and allow it to cure fully before occupancy.
A Simple Decision Checklist Before You Start Digging
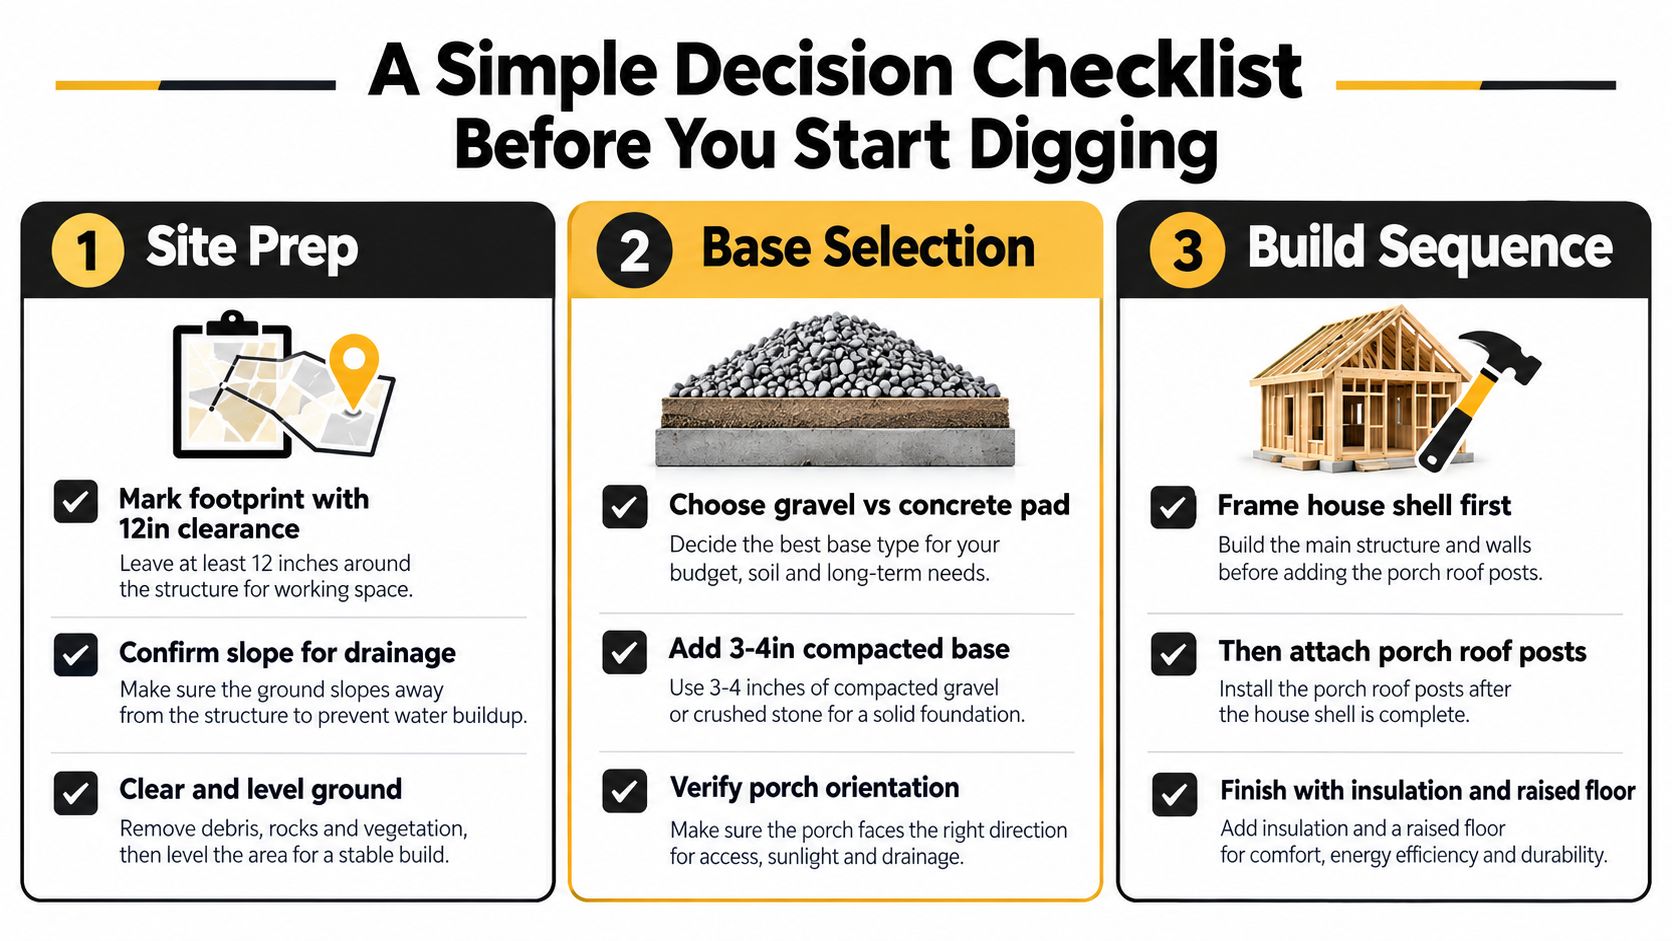
A reliable dog house with porch begins with a short site review. Walk the yard, identify where water travels, and decide whether the shelter needs a permanent slab or a drainable platform. The checklist below is the minimum standard I'd want in place before setting the first wall frame.
Location and drainage
- Dry placement: Choose ground that doesn't collect runoff from the house, downspouts, or uphill lawn.
- Clear footprint: Mark the shelter and porch, then allow at least a foot of clearance outside the full structure.
- Outward grade: Confirm the site carries water away at roughly one inch per four feet.
- Usable access: Leave enough room to inspect the lower walls, clean bedding, and remove leaves from beneath the porch.
Foundation and elevation
- Firm subgrade: Remove sod, roots, and organic debris before placing gravel, pavers, or forms.
- Compacted base: Compact the exposed soil and granular fill so the platform doesn't settle unevenly.
- Foundation match: Use concrete for a stiff permanent surface, gravel where drainage and flexibility matter, or pavers where modular repair is useful.
- Pad coverage: Extend the foundation beyond the porch and roof drip line so runoff doesn't land beside the wall.
- Raised floor: Keep the sleeping floor 3 to 4 inches above the pad when the assembly and site conditions allow, while maintaining a stable, protected support system.
Structure and dog comfort
- Independent porch: Support the porch roof with its own runners, posts, or framing rather than relying on the house walls alone.
- Water-shedding roof: Use a sloped roof that directs runoff away from the entrance and porch surface.
- Protected shell: Insulate the floor, walls, and roof, and keep insulation inaccessible to chewing.
- Controlled ventilation: Provide air movement above bed level without leaving a direct wind path through the sleeping area.
- Weather-resistant contact points: Protect or replace untreated framing where it can receive splash-back or remain against the base.
- Square sequence: Build the base, floor, walls, roof, and porch details in that order, checking square before each connection.
The commonly skipped items are the ones that decide whether the shelter lasts through one wet season or many: an overhanging porch without enough pad extension, an uncompacted base, and untreated framing at ground-contact points. Those details matter more than decorative trim.
The same site conditions affect a base for a storage shed, a gazebo foundation, and a dog shelter. Homeowners comparing shed foundations contractors near me, garage foundation contractors near me, or concrete foundations should look for a crew that discusses drainage and soil preparation before quoting the surface material. Firm Foundations provides gravel and concrete foundation work for small structures and larger projects across Pennsylvania, Maryland, Delaware, and New Jersey, with site preparation, excavation, forming, pouring, and finishing included according to the selected foundation design.
Firm Foundations can prepare a properly drained gravel or concrete base for a dog house with porch, shed-style enclosure, gazebo, or other backyard structure. Visit Firm Foundations to request a free quote and discuss your site, access, soil, drainage, and preferred foundation type before you build.