
Cupola on Garage: A Complete 2026 Guide
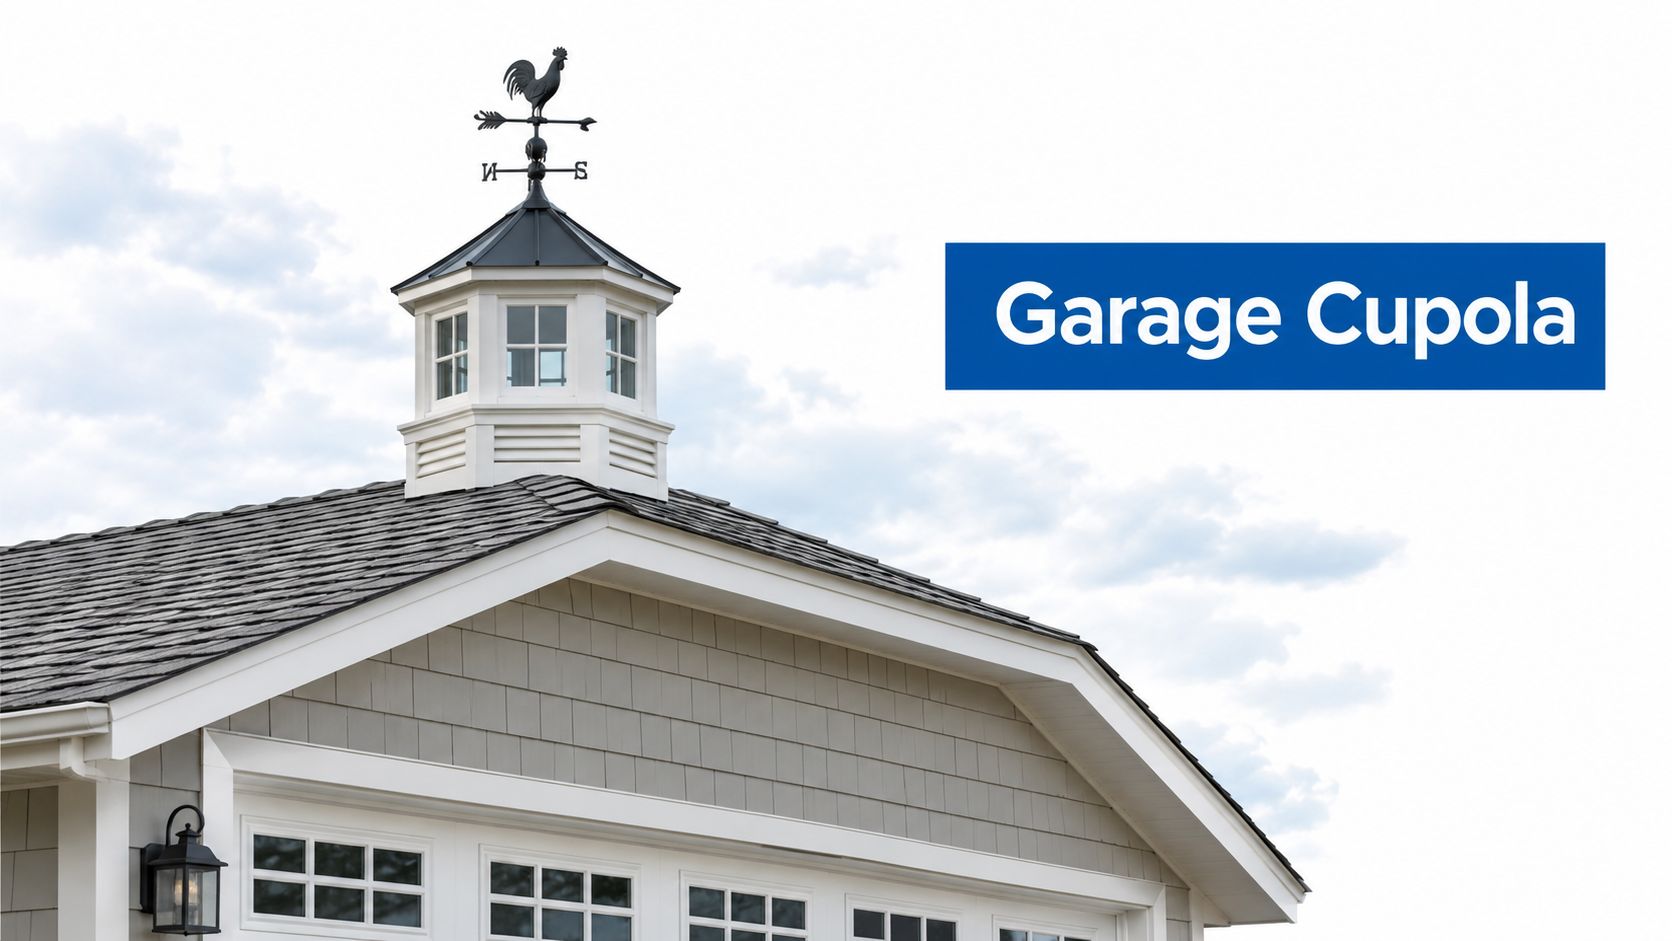
You're standing in the garage after a hot, humid week. The air feels stale, the corners smell faintly of mildew, and the plain roofline offers little character from the driveway. You're considering a cupola on the garage, but the practical question comes before the design question: will it improve the building, or will it just add another roof detail to maintain?
For homeowners in Pennsylvania, Maryland, Delaware, and New Jersey, that decision connects the roof above to the structure below. A functional cupola depends on airflow, framing, flashing, and secure attachment. The garage foundation, footings, drainage, and roof system all need to work together, whether you're planning a detached garage, a barn shed, a gazebo foundation, or a base for a storage shed.
What a Cupola on Garage Really Does
A cupola is a small, square or octagonal roofed structure placed on a building's ridge or peak. It began as a practical architectural feature, often associated with barn ventilation, and later became common on homes, garages, sheds, and other outbuildings. Britannica traces widespread use in Islamic architecture to around the eighth century, later spread to Russia in the seventeenth and eighteenth centuries, and notes its arrival in English domestic architecture in the late seventeenth century before its use in the United States during the Federalist era. Britannica's history of the cupola shows why the feature is more than a passing style trend.
On a garage, a cupola usually serves two purposes:
- Architectural purpose: It breaks up a broad, plain gable and gives the roofline a finished focal point.
- Ventilation purpose: A louvered or screened design can let warm, moist air escape from the enclosed roof space.
The distinction matters. A decorative cupola may have solid sides, windows, or a finial-topped roof, but it won't necessarily move air. A venting cupola has louvered or screened sides that allow air to pass while helping keep rain and pests out.
Most modern kits are roof-mounted. They fasten to the roof deck and receive flashing details similar to a skylight. They generally aren't anchored through the ridge beam, although the roof still needs proper blocking and structural review before anyone cuts an opening.
Builder's rule: Decide whether you need an exhaust vent, a visual accent, or both. Buying a decorative cupola and expecting attic airflow is a common source of disappointment.
A roofing contractor can also help you compare the cupola detail with the rest of your roof system. For broader regional roofing considerations, this Phoenix roofing company resource offers useful context on roof construction and ventilation, even though local weather and building requirements will differ.
How a Garage Cupola Moves Air Through the Roof
A vented cupola works through passive stack effect, not a motor or fan. Sunlight warms the roof deck, the attic air becomes warmer, and that warmer air rises toward the highest point of the garage roof. The cupola provides a high escape route through its louvered sides.
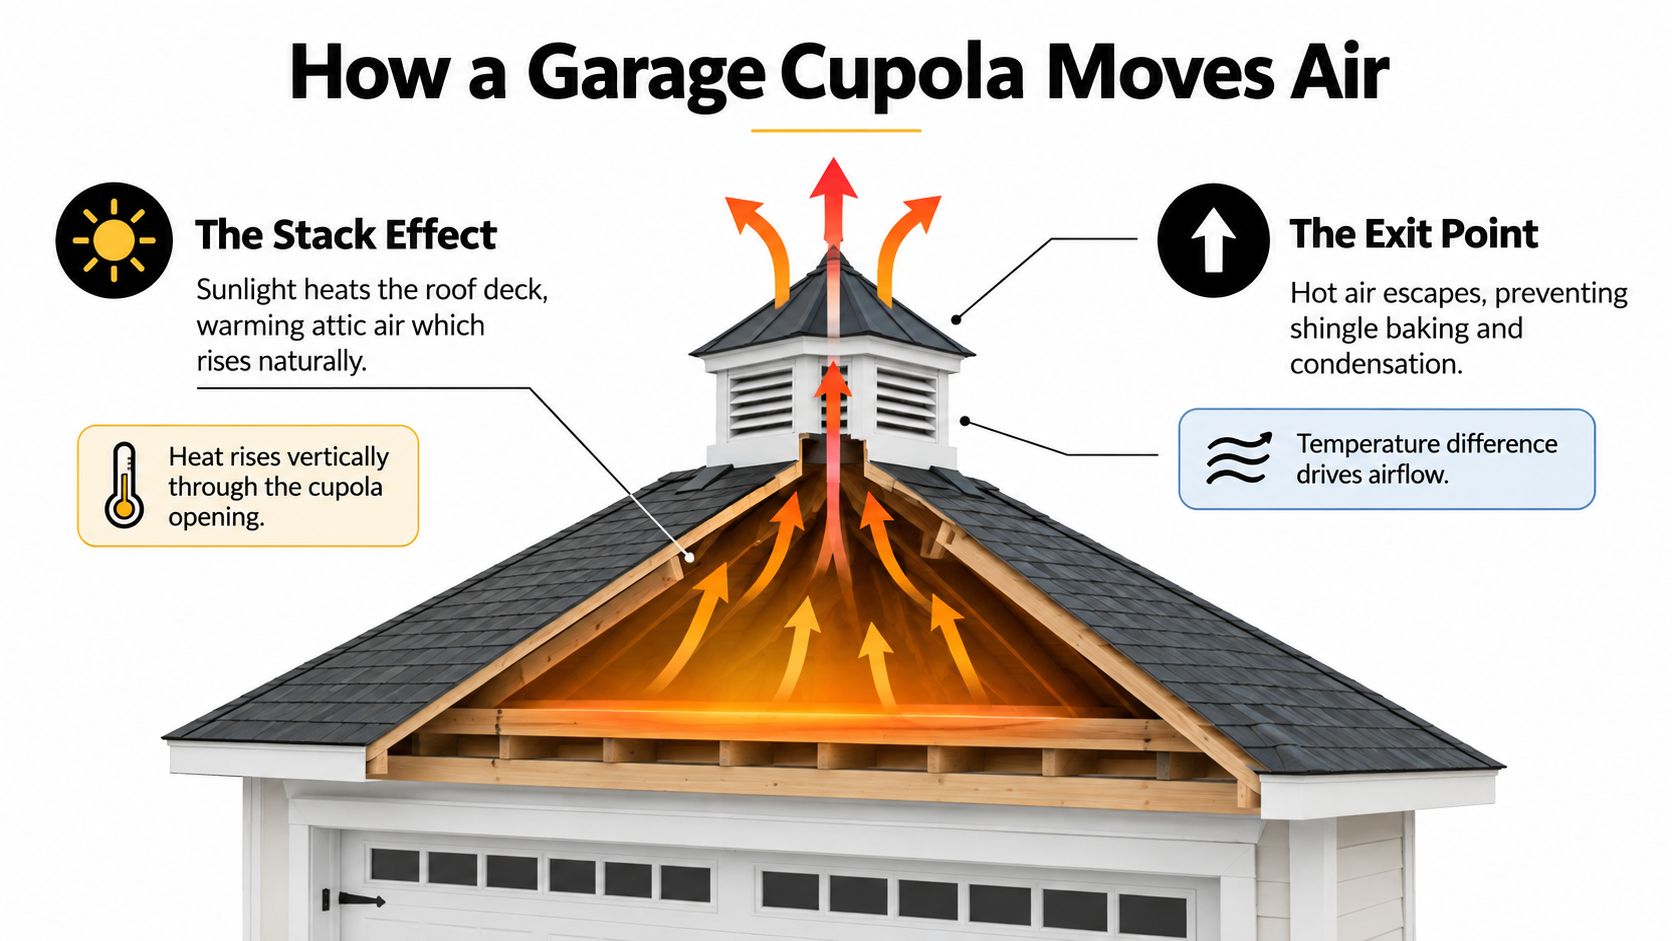
The cupola is only the exhaust side of the system. Replacement air has to enter lower in the roof assembly through soffit vents, low gable vents, or another designed intake path. As warm air leaves at the ridge, cooler air enters below, keeping the movement continuous when temperature differences create enough pressure.
A 24-inch cupola provides roughly 130 to 150 square inches of net free vent area, according to independent roof-vent guidance from this cupola ventilation reference. Typical attic ventilation guidance uses about 1 square foot of net free vent area for each 150 square feet of attic floor, so one properly sized cupola may contribute meaningful exhaust capacity. It still works best with equal or greater intake area near the lower roof edge.
For a typical single- or two-car garage, a 24-inch vented cupola can be a practical starting point, but the roof layout matters more than the product label. A sealed attic with no intake path may show little improvement after installation. In an attached garage, an incorrectly balanced system could even draw air from conditioned living space above the garage if the ceiling assembly has openings.
Watch the short video below for a visual explanation of passive roof ventilation.
Before choosing a cupola, review the principles in this RRSATX guide to roof ventilation and compare them with your garage's soffits, gables, and roof cavity. If the garage has a ridge vent already, a cupola may add limited performance unless the existing exhaust arrangement and intake paths are evaluated together. You can also review this guide to a ridge vent for a shed when comparing roof ventilation options for smaller outbuildings.
Cupola Styles and Materials for Garages
The right cupola should look as though it belongs on the garage. Shape, material, roof pitch, and ventilation openings all affect that result.
A square cupola is the most common choice for a garage. Its simple footprint is easy to flash, and its clean lines suit a straightforward gable roof. A rectangular cupola works well on a wider garage roofline, especially when the design includes a weathervane along the ridge. An octagonal cupola has a more traditional barn appearance and often fits steeper roofs, craftsman homes, and farmhouse-style buildings.
The midsection determines whether the cupola is functional. Windowed sides suit a decorative installation, while louvered sides are necessary for venting. Screens behind the louvers help keep insects and larger pests out of the roof cavity.
| Style | Common Materials | Best Roof Pitch | Maintenance Level |
|---|---|---|---|
| Square | PVC, vinyl, wood, aluminum | 4/12 to 12/12 | Low to moderate |
| Rectangular | Wood, fiberglass, aluminum, steel | 4/12 to 12/12 | Moderate |
| Octagonal | Cedar, copper, standing-seam metal | 4/12 to 12/12 | Moderate to high |
| Custom roof base | Any selected material | Flatter or steeper roofs | Depends on material |
PVC and vinyl are attractive for homeowners who want low maintenance and a paintable surface. Extreme heat can cause some products to warp, so product quality and installation details matter.
Wood, especially cedar or pine, gives the most traditional look. It requires sealing and periodic repainting or staining, particularly where moisture and freeze-thaw cycles are common.
Metal options include copper, standing-seam aluminum, and steel. They generally offer a durable finish and a premium appearance, but they cost more than basic vinyl or painted wood. Stock bases commonly fit roof pitches from 4/12 to 12/12, while flatter or steeper roofs may need a custom base.
Coordinate the cupola roof and trim with the garage roof color. A dark metal roof may suit a copper or painted metal cupola, while a shingle roof may call for matching shingles on the cupola cap. The goal is a unified roofline, not an accessory that looks placed there after construction.
Sizing and Placement Rules That Get Right
A cupola can be well built and still look wrong if it's undersized, oversized, or placed without regard to the roof framing. Start with proportions that make sense from the street.
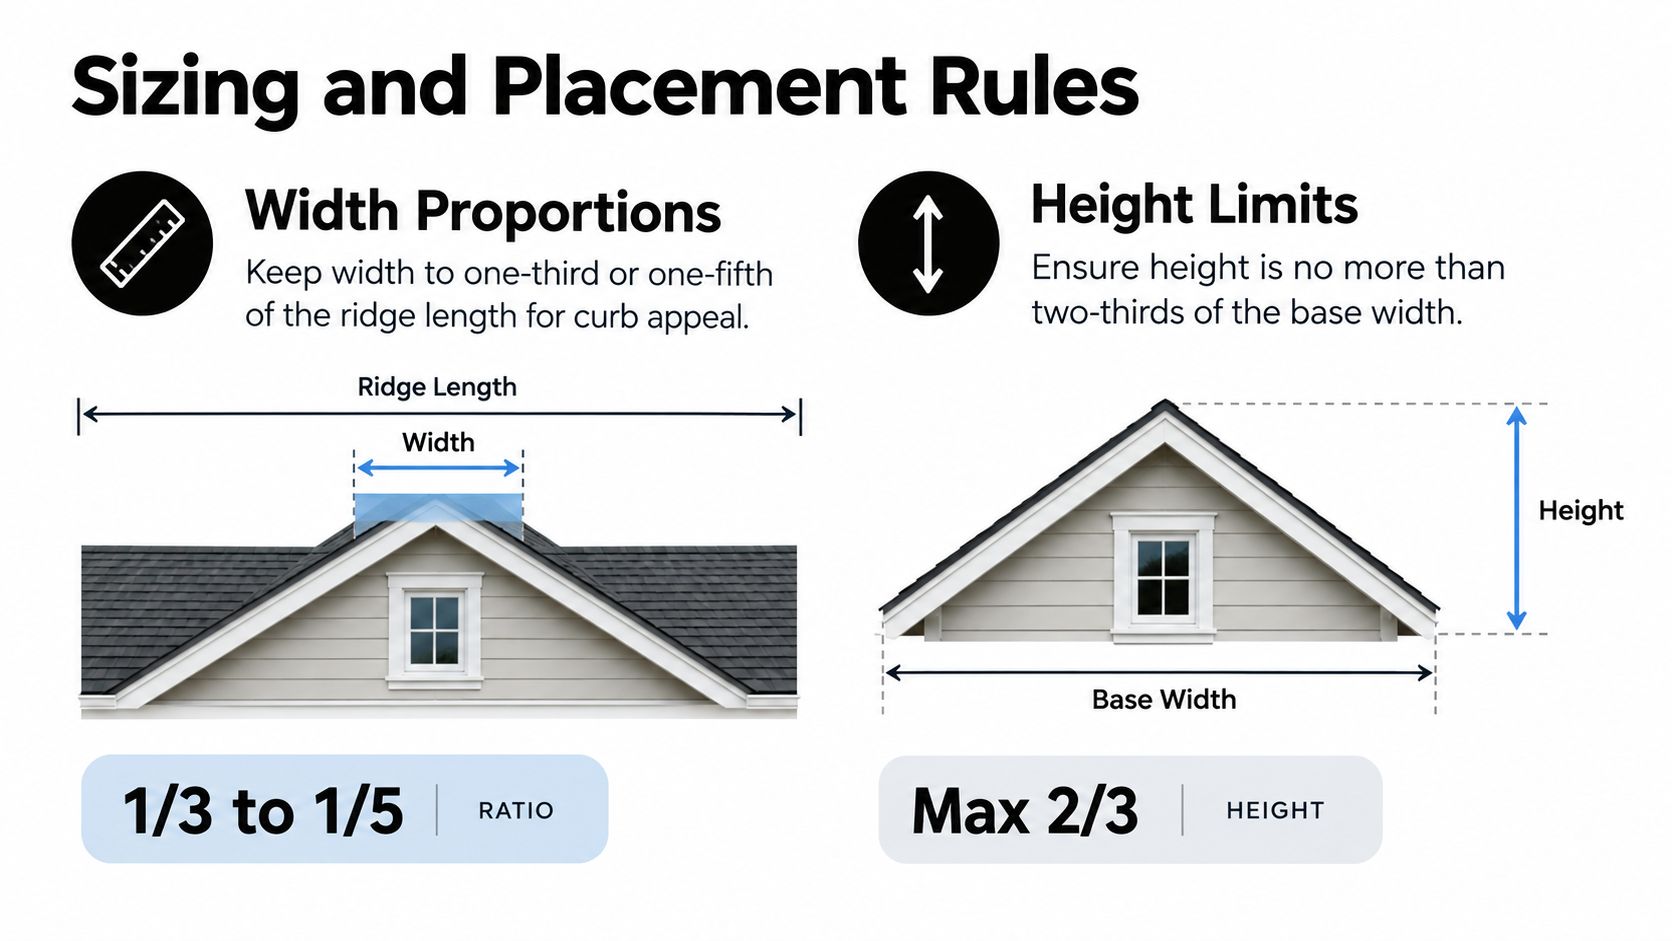
A common visual rule places the cupola width at roughly one-third to one-fifth of the roof ridge length. Its height should be no more than two-thirds of the base width, so the structure has enough presence without appearing tall and unstable. The base footprint also needs to match the roof pitch so its sides sit flush rather than rocking on the shingles.
Choose the opening before the ornament
For a single- or two-car garage attic, a 24-inch square cupola is a practical floor for a venting design. If the attic floor is larger than roughly 400 square feet, or if the garage sits in a hot, humid climate, the roof may need a larger cupola or additional ventilation. The relevant question is the net free vent area, not the outside dimensions.
Centering the cupola on the ridge usually gives the cleanest appearance. An offset location can make sense when a truss, ridge beam, electrical run, or other framing member prevents a safe opening in the center. Moving the cupola for structural reasons is preferable to cutting a roof member without an engineered solution.
Before cutting, inspect the attic and verify:
- Truss or rafter layout: Identify the framing type and spacing.
- Ridge construction: Locate any ridge beam, doubled rafters, or structural connection.
- Blocking space: Confirm that the cupola base can receive solid blocking.
- Air path: Trace a clear route from lower intake vents to the cupola opening.
- Roof finish: Check the shingle, metal, or membrane system so flashing can be integrated correctly.
A cupola that looks centered from the driveway may not be centered within the roof framing. Measure from both the exterior and attic side, then mark the opening carefully. That simple check can prevent unnecessary roof repairs and changes to the garage foundation or framing plan later.
Cupola Costs and DIY vs Hiring a Pro
A cupola installation has three separate cost categories: the cupola itself, roof work, and finishing. The visible unit is only part of the project.
A basic vinyl or painted wood cupola generally costs $150 to $450, while mid-grade cedar, fiberglass, or copper-clad units commonly fall between $450 and $1,200. Premium copper or custom-built cupolas with weathervanes can exceed $1,500. These figures come from the project cost ranges provided for this guide and should be treated as planning estimates rather than a quote.
| Cupola Tier | Unit Price | DIY Total | Contractor Total |
|---|---|---|---|
| Basic vinyl or painted wood | $150 to $450 | $150 to $600 | $550 to $1,350 |
| Mid-grade cedar, fiberglass, or copper-clad | $450 to $1,200 | $450 to $1,350 | $850 to $2,100 |
| Premium copper or custom-built | Above $1,500 | Above $1,600 | Above $1,900 |
Roofing labor typically adds $400 to $900. That work may include framing the opening, adding blocking between rafters, cutting and replacing shingles, installing step flashing, building a cricket on the upslope side, and sealing the finished connection. A professionally installed project realistically lands around $700 to $2,200 all-in, depending on the unit, roof material, access, framing, and finishing requirements.
DIY can make sense for a comfortable homeowner with a shingle roof, basic framing experience, and a clear ridge area. Even then, the job requires careful layout and weatherproofing. A metal roof, steep pitch, unknown truss layout, or difficult access shifts the decision toward a qualified roofer.
A cupola leak often appears far from the original cut. Saving on installation doesn't help if the repair requires removing roof panels or replacing damaged sheathing.
Ask whether the installer will document the flashing method, fastening pattern, and any required structural blocking. If the garage is part of a larger construction project, coordinate the cupola with garage footings and foundations, concrete forms, electrical work, and roof warranties rather than treating it as a last-minute decoration.
Installation Steps and Weatherproofing
A functional cupola becomes part of the roof envelope. The opening, framing, flashing, and fasteners all have to manage water and wind together.
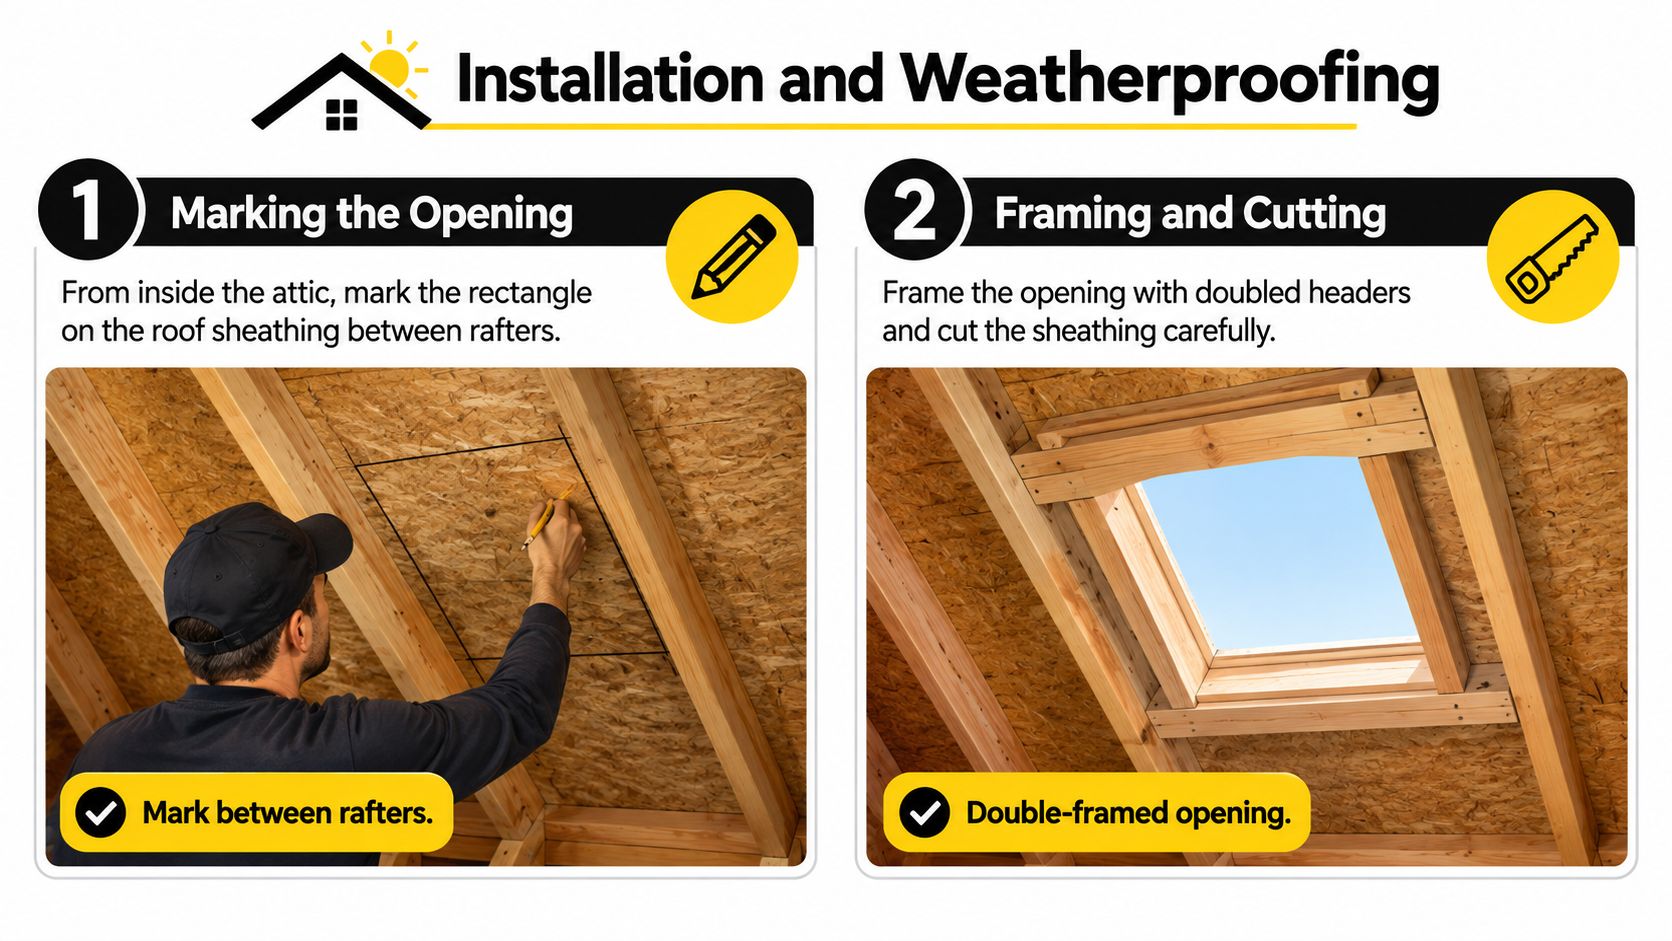
Mark and frame the opening
A roofer normally begins from inside the attic. The opening is marked on the roof sheathing between rafters or trusses, with the outside layout checked against the cupola base. The installer then cuts the sheathing carefully and frames the opening with doubled headers.
Blocking gets screwed into the rafters so the cupola base has continuous material to grip. That blocking carries the base and gives the fasteners a reliable connection. Cutting through a rafter or altering a truss without an approved structural solution can weaken the roof.
Build the water-shedding detail
The base sits on a continuous bead of roofing sealant, but sealant isn't the primary drainage system. The installer weaves step flashing into each shingle course along the sides and adds a cricket or saddle on the upslope side to split water around the raised feature.
The base then slides over the opening and gets secured with corrosion-resistant screws through its flange and into the blocking. The cupola body and roof are installed above it according to the manufacturer's fastening pattern. Metal roofs require compatible flashings and fasteners, while shingle roofs demand careful course-by-course integration.
Check the details that cause callbacks
Three failures appear repeatedly after rushed installations:
- Wind uplift: An attractive cupola can loosen or blow off when installers use too few fasteners or miss the blocking.
- Upslope leaks: Skipping the cricket or step flashing gives rain and melting snow a direct path beneath the roof covering.
- Insect entry: A vent screen that isn't durable and corrosion-resistant can allow wasps to nest inside the cupola or roof cavity.
The roof opening should remain aligned with the intended attic airflow path. A properly framed and flashed installation protects the roof deck, while the cupola's louvers provide the exhaust route described earlier. If the roof already has ventilation, the installer should verify that the new opening complements rather than disrupts the existing system.
Maintenance, Permits, and When a Cupola Is Worth It
A cupola isn't maintenance-free, even when it uses vinyl or metal. Inspect the sealant and flashing annually, look for lifted shingles or loose fasteners, and check the vent screen for wasp nests and debris. Wood cupolas generally need repainting or restaining every 2 to 3 years, depending on exposure and the finish used.
The weathervane or finial deserves its own inspection. Check its fasteners, rod, and mounting point after severe weather, particularly on exposed ridges. A loose top feature can introduce movement into the cupola roof and enlarge small water-entry points.
Check approvals before cutting
Permit requirements vary by municipality. A permit may be triggered when the cupola alters roof structure, creates a new roof penetration larger than 100 square inches, or changes ridge ventilation in a jurisdiction following IRC Section R806. Verify the local interpretation before ordering the unit.
Homeowners' associations may regulate roofline changes, colors, and visible architectural features. Historical districts can impose additional review requirements. In areas with substantial snow or wind exposure, including parts of New England and the Upper Midwest, the cupola attachment and roof framing may need to account for local loads.
If the garage is being built from the ground up, review the roof feature alongside garage setback requirements and the broader site plan. Setbacks, drainage, excavation, concrete foundations, and the roofline should be coordinated before construction begins.
| Garage Condition | Cupola Worth It? | Better Alternative |
|---|---|---|
| Detached garage with heat buildup | Often yes | Balance a vented cupola with lower intake vents |
| Unventilated attic with a visible ridge | Often yes | Design a complete intake and exhaust system |
| Decorative garage with a prominent roofline | Yes, if properly flashed | Use a sealed decorative cupola |
| Existing balanced ridge and soffit ventilation | Maybe | Improve or maintain the current system |
| Flat-roofed garage | Usually no | Use a roof system designed for the existing slope |
| Strict HOA or historical restrictions | Often no | Choose an approved roofline detail |
| Attached garage with effective ridge and soffit vents | Often no | Maintain the existing balanced ventilation |
A cupola is usually worth considering on a detached garage where heat and moisture collect, where the attic lacks effective exhaust, or where the roof is highly visible from the street. It may be unnecessary when the garage already has balanced ridge and soffit ventilation, particularly if a new roof penetration adds cost without solving a real problem.
The sound decision treats airflow, flashing, and aesthetics as one roof-and-foundation choice. If the project also needs a garage slab, garage foundation contractors, excavation near me, concrete foundations, or a cement foundation for garage construction, plan those scopes together so drainage and structural support aren't handled separately.
Firm Foundations provides site preparation, excavation, gravel pads, footings, concrete foundations, and garage foundation work across Pennsylvania, Maryland, Delaware, and New Jersey. Visit Firm Foundations to discuss the roof, drainage, garage footings and foundations, or foundation pad your project needs, and request a clear quote before work begins.