
Concrete Garage Apron Guide for Pennsylvania Homeowners
Every spring, homeowners across Pennsylvania, Maryland, Delaware, and New Jersey notice the same frustrating problem. The driveway looks serviceable, but the concrete right outside the garage door holds water, lifts at the edges, or sheds small flakes after a winter of freezing and thawing. That narrow strip is the concrete garage apron, and it's often the first part of the approach that needs professional attention.
A durable apron needs more than a smooth finish. It needs the right thickness, a compacted base, controlled drainage, movement joints, and a design suited to the soil and weather around the home. Whether you're searching for garage foundation contractors near me, concrete contractors for a replacement, or a practical assessment of an existing slab, the details below will help you separate a lasting installation from a surface patch that fails again.
Why the Garage Entry Is the First Place Concrete Fails
The garage entry takes concentrated abuse that the middle of the driveway rarely sees. Tires brake, turn, and pivot in the same narrow area. Roof runoff often reaches the garage corners, while melting snow and de-icing residue collect along the door line. If the apron sits over disturbed soil near the house foundation, settlement can add another source of movement.
Municipal codes reflect that stress. One Ohio code requires driveway aprons at street and sidewalk crossings to be at least 6 inches thick with 6x6x10/10 welded wire fabric, while private driveways may be 4 inches thick, as shown in the Rocky River driveway apron requirements. Another Illinois ordinance specifies 6 inches of Portland-cement concrete over a 5-inch compacted granular base, with apron widths tied to the garage connection. Those differences show that the apron has long been treated as a higher-stress transition slab, not ordinary decorative flatwork.
Four failure patterns appear repeatedly
- Settlement: Loose or poorly compacted soil beneath the approach leaves a low point where water can run back toward the garage.
- Scaling: Water and winter chemicals enter the concrete surface, then freezing conditions loosen the finished layer.
- Random cracking: The slab moves against an adjacent garage floor, curb, sidewalk, or driveway without enough planned relief.
- Joint spalling: Rigid edges press against one another, breaking the concrete along the transition.
The apron sits between different materials and different support conditions. A garage floor is part of the building's interior structure, while the driveway approach responds to outdoor moisture, frost, and changing subgrade conditions. Treating both slabs as one uninterrupted piece is a common reason cracks appear exactly where homeowners least want them.
What a Concrete Garage Apron Actually Does
A concrete garage apron is the structural transition strip between the existing garage floor and the driveway approach. It's commonly about 4 to 8 feet long, measured outward from the garage, and it usually spans the width of the garage opening. Think of it as a house threshold built for vehicles and water instead of feet and drafts.
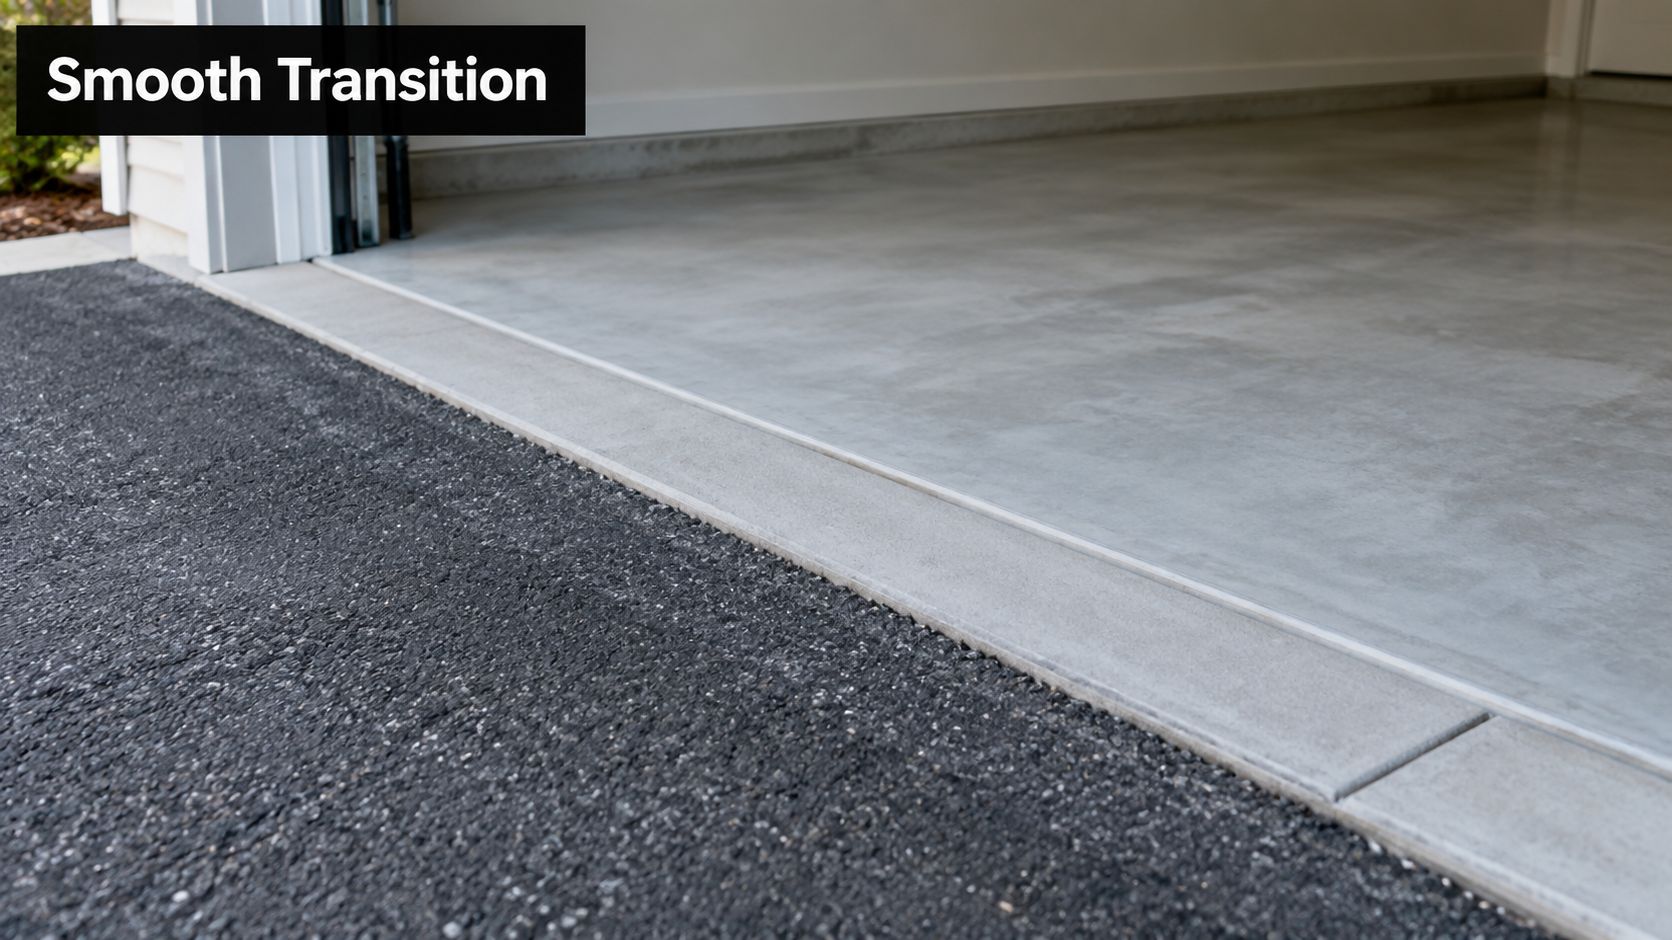
The apron performs several jobs at once:
- It carries vehicle loads across the transition. The concrete strip receives tire impact as vehicles move from the driveway into the rigid garage floor. It has to transfer that load without leaving a thin, unsupported edge.
- It moves water away from the door. A properly formed slab sheds rain and meltwater outward instead of creating a puddle against the threshold.
- It accommodates movement. The apron, driveway, and garage floor don't respond identically to temperature changes, moisture, and soil movement. A planned joint gives those materials room to move.
- It supports the door seal. A clean, properly graded surface helps the rubber seal meet the floor consistently, reducing gaps caused by an uneven transition.
Why the specifications differ
The apron isn't merely an extension of the garage floor. It isn't automatically the same as the driveway, either. It carries repeated turning loads at an edge, receives concentrated runoff, and connects materials that may have different bases and movement patterns.
An Illinois guide uses a 6-inch concrete apron, a 4-inch compacted aggregate sub-base, and a minimum 2% slope, while a Michigan municipal code requires driveway aprons to be at least 5 inches thick, as shown in the Davison concrete apron standard. Local rules and site conditions still control the final design, especially when the apron connects to public sidewalks or curbs.
Thickness, Slope, Reinforcement, and Joints That Hold Up
A long-lasting apron depends on four decisions made before the concrete truck arrives. Thickness handles load, slope manages water, reinforcement controls crack movement, and joints keep adjoining slabs from fighting each other.
Thickness and slope
For residential work, a practical design typically starts at 5 to 6 inches, with 6 inches favored where vehicle loads, turning stress, or variable soil conditions are higher. That range is consistent with the municipal pattern described in the Rocky River code and the Davison ordinance. A standard interior garage floor may be thinner, but the apron has less forgiving support at its outer edge.
The finished surface should drain away from the garage at about 1/4 inch per foot, or roughly 2%, according to concrete driveway drainage guidance. This grade is enough to move water without creating an abrupt transition. Some residential driveway standards allow slopes up to 8%, while others call for a minimum of 2%, as detailed in the West Dundee driveway apron standards.
Reinforcement and joints
Wire mesh or rebar doesn't prevent every crack. It helps hold cracks tighter after concrete moves. Reinforcement must be supported above the stone base so it remains inside the slab rather than lying flat against the ground.
Where the apron meets the garage floor, sidewalk, curb, or another rigid element, use a full-depth isolation or expansion joint. Some municipal standards specify 1/2-inch pre-molded filler, installed slightly below the finished surface, as described in the Orland Hills joint requirements. Control joints should be planned before placement, not cut as an afterthought. A thickened edge may also be appropriate where the apron projects beyond the garage walls.
| Parameter | Recommended Range | Why It Matters |
|---|---|---|
| Slab thickness | 5 to 6 inches | Provides load capacity at the high-stress transition |
| Drainage slope | About 2% | Moves water away from the garage threshold |
| Reinforcement | Welded wire fabric or supported rebar | Holds movement-related cracks together |
| Isolation joint | Full depth, often 1/2-inch filler | Lets connected slabs move independently |
| Apron geometry | Follow local width and slope rules | Protects drainage, access, and code compliance |
For additional background on planning concrete movement joints, review this guide to concrete joint spacing.
How a Garage Apron Is Installed From Excavation to Finish
A professional crew should be able to explain the work in a clear sequence. The visible pour is only one part of the job. Most long-term apron failures begin below the surface, where an unstable base leaves the slab vulnerable to settlement and frost movement.
The work begins below the concrete
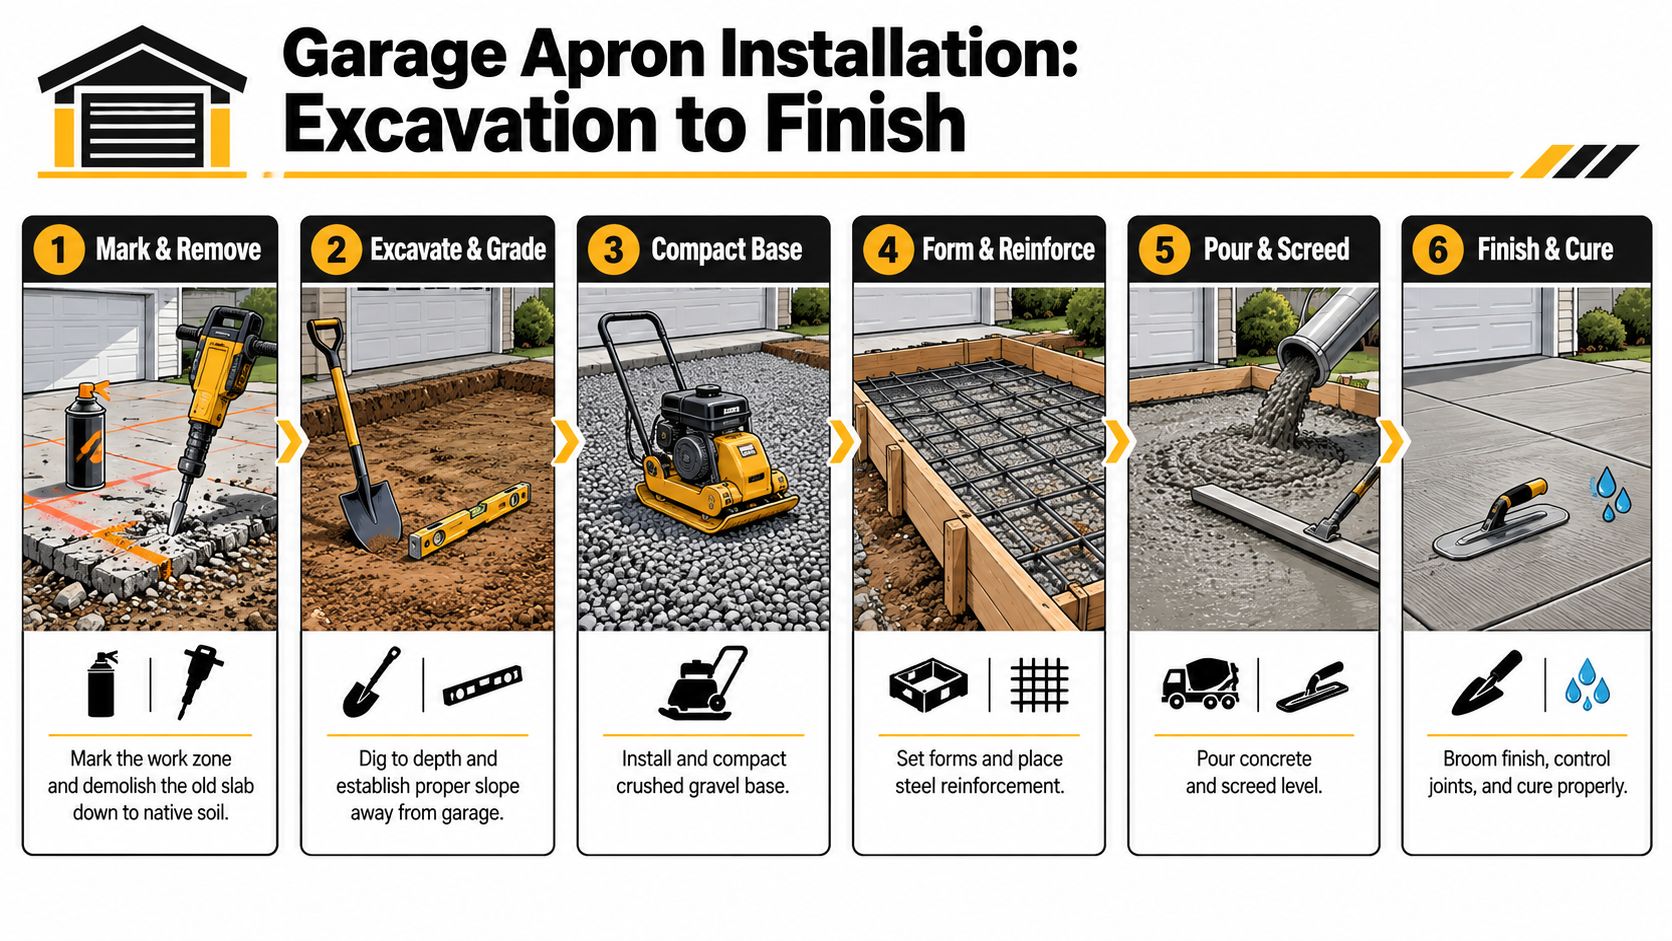
The crew marks the work area, protects nearby surfaces, and removes the existing slab or asphalt down to suitable native soil. Excavation commonly continues 8 to 12 inches below the finished grade to make room for a compacted aggregate base, but the final depth depends on the site and local requirements.
Crushed stone is placed in manageable lifts and compacted with a plate compactor. Uniform support matters more than filling the hole with loose gravel. The crew then sets forms to establish the apron width, threshold elevation, and outward drainage grade.
Placement and finishing
After the base and forms are checked, the crew installs reinforcement and joint material before placing concrete. A minimum 4,000 psi mix is commonly specified for this type of exterior residential work, with the mix and air content selected for the local freeze-thaw environment.
The crew pours, screeds, bull floats, edges, and cuts the planned control joints. A broom finish usually provides practical traction near a garage, especially when the surface may be wet or exposed to winter conditions. Curing compound or wet blankets help protect the fresh slab while it gains strength. Depending on apron size and weather, the work commonly takes one to three working days, including removal, preparation, placement, and finishing.
A careful crew won't rush the finish or add water to make the concrete easier to work. Those shortcuts can weaken the surface and leave the apron more exposed to scaling and abrasion.
Freeze-Thaw Mistakes That Crack Aprons in Cold Climates
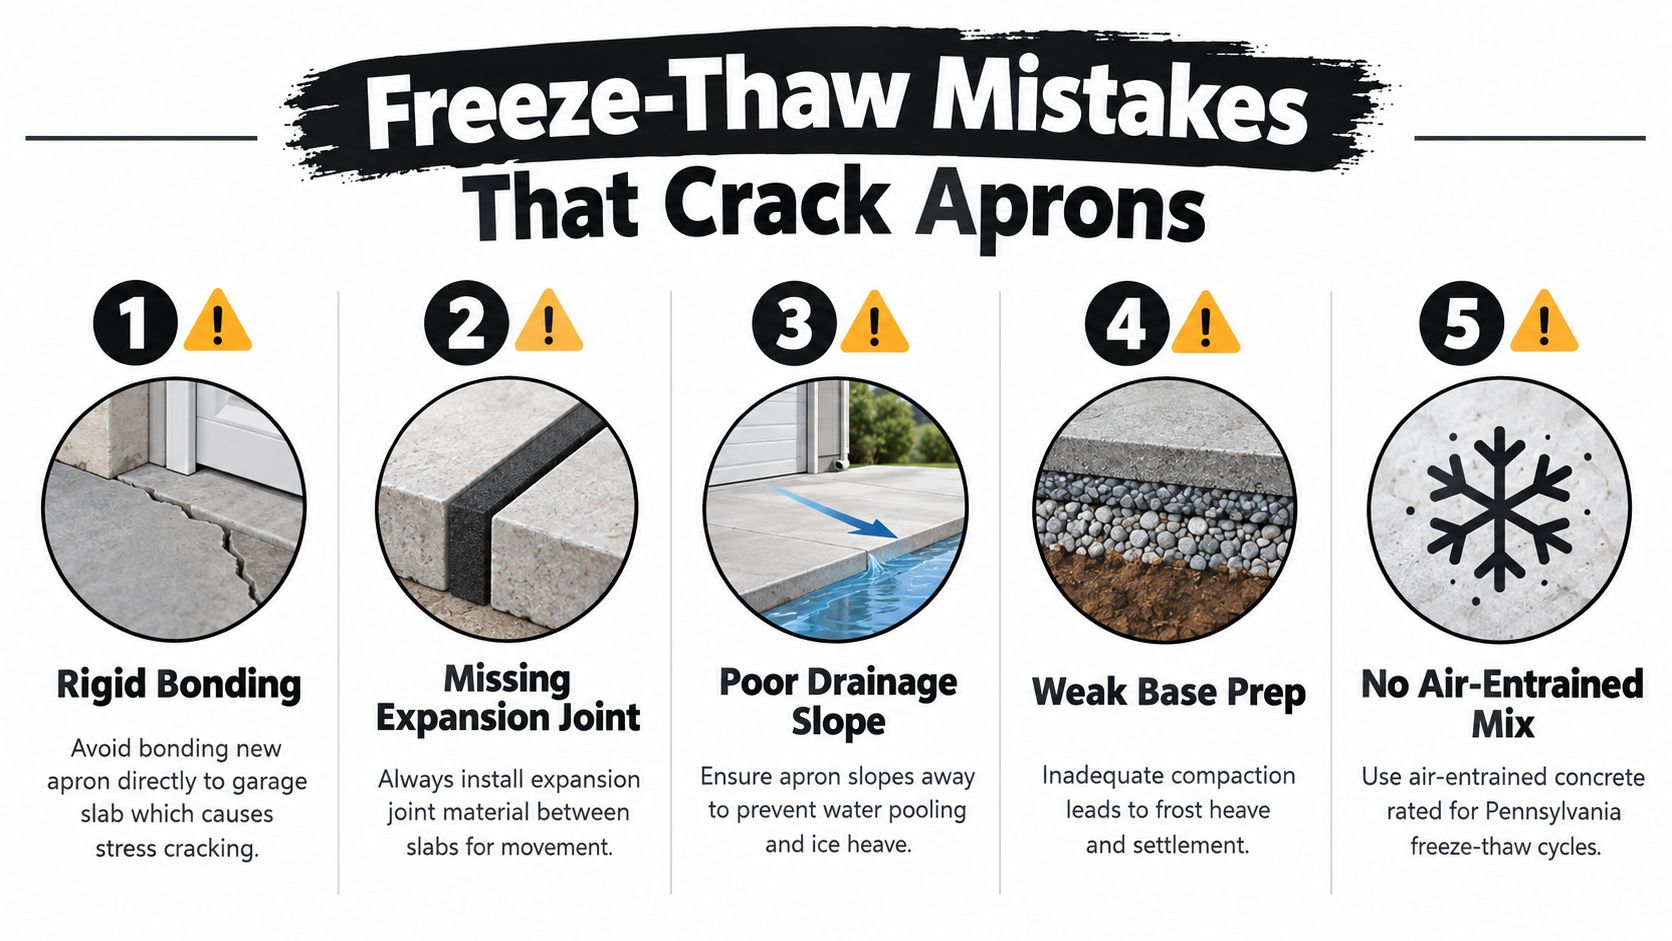
The instinct to “tie the new apron into the garage” sounds strong, but rigid bonding can be the wrong choice in Pennsylvania and the surrounding Mid-Atlantic states. When frost-susceptible soil, moisture, and freezing temperatures combine, the outdoor apron may move differently from the garage floor. A rigid connection can transfer that movement into the threshold and create a predictable crack line.
A floating joint, bond break, or suitable compressible material along the garage edge lets the apron move independently. This doesn't mean the joint should be ignored. It should be properly formed, protected from water entry, and finished so debris doesn't collect against the door seal. In some conditions, insulation along the garage edge may help limit frost-related movement, but the right detail depends on excavation depth, soil, drainage, and local practice.
Shortcuts that create expensive repairs
- Rigid bonding: Doweling the apron directly into the garage floor can transfer outdoor frost movement into the building edge. A floating connection may be safer where seasonal movement is expected, as discussed in this cold-climate garage apron repair guidance.
- A missing stone base: Pouring directly over weak or disturbed soil leaves the slab vulnerable to uneven support.
- A thin outside edge: The slab needs enough depth where tires cross the perimeter and where the base may be less stable.
- No control joints: Without planned relief, the concrete chooses its own crack locations.
- Poor drainage: Water that remains beside the door can enter joints, saturate the base, and freeze.
- Premature sealing: A coating applied before the concrete has properly cured can trap moisture or fail to bond well.
Decorative finishes deserve the same scrutiny. Stamped patterns, stone-like textures, earthy colors, and sealers can make an apron look more intentional, but snow shovels, plows, de-icers, and repeated wetting still test the surface. A broom finish is often the simpler long-term choice when traction and easy maintenance matter more than appearance. If decorative concrete is selected, the installer should explain how the finish and sealer will be maintained through winter.
Repair or Replace a Failing Garage Apron
A failing apron should be judged by how it handles water and load, not just by how many cracks are visible. Surface damage with a firm, level base may be repairable. Settlement, hollow areas, broken edges, and water flowing toward the garage usually point to a deeper problem.
Signs a repair may be reasonable
Hairline cracks under 1/8 inch with no vertical offset may be sealed with a flexible polyurethane product or an appropriate epoxy injection, depending on the crack and the surrounding concrete. The purpose is to limit water entry, not to disguise a moving slab.
Start with three simple observations:
- Measure the opening: A coin can help you compare a hairline crack with a wider opening, although a contractor should make the final assessment.
- Watch heavy rain: If water runs back toward the garage door or sits in a low point, sealing alone won't correct the grade.
- Tap the surface: Hollow sounds can indicate voids beneath the slab, especially when paired with settlement or edge separation.
When replacement makes more sense
Cracks wider than 1/4 inch, settled sections that funnel water toward the threshold, and chunks lost to freeze damage generally indicate that the slab or its base has failed. Patching the top may improve the appearance temporarily, but it doesn't rebuild missing support below the concrete.
| Condition Observed | Typical Action |
|---|---|
| Hairline crack under 1/8 inch, no vertical movement | Clean, seal, and monitor |
| Crack wider than 1/4 inch | Schedule a professional assessment |
| Low spot directing water toward the garage | Correct grade and investigate the base |
| Hollow area beneath the slab | Evaluate for voids, settlement, or replacement |
| Spalled chunks and broken edges | Remove failed concrete and rebuild affected support |
| Sound slab with isolated surface wear | Consider targeted repair and appropriate sealing |
The repair-versus-replacement decision should account for the cause. If the sub-base is weak, a new surface over the same material will likely repeat the problem. If the base remains sound and drainage works, a focused repair can be a sensible option.
What Goes Into a Garage Apron Quote and Who Should Install It
A useful quote explains what happens below, within, and around the concrete. The contractor should measure the apron, calculate the area, inspect access for equipment, and identify whether demolition and disposal are required. The proposal should also identify excavation, aggregate, compaction, forms, concrete thickness, mix strength, reinforcement, joints, finishing, curing, and cleanup.
Compare the scope, not just the total
Two quotes can differ substantially when one includes excavation and reinforcement while another assumes a shallow placement over existing material. A lower price may also omit disposal, joint filler, difficult access, or weather-related schedule changes. Those omissions can matter more than the initial difference in the bid when the project faces repeated freeze-thaw movement.
| Line Item | Typically Included | Commonly Added or Omitted |
|---|---|---|
| Site preparation | Layout and basic access planning | Extra removal, difficult access, landscape protection |
| Demolition | Removal of the existing apron | Disposal fees or deeper excavation |
| Sub-base | Crushed aggregate and compaction | Additional stone for weak or wet soil |
| Concrete | Specified thickness and mix | Upgraded mix, air entrainment, or special color |
| Reinforcement | Mesh or rebar listed in the scope | Heavier reinforcement or chairs |
| Joints | Isolation material and control joints | Drainage channel or special edge details |
| Finish and cure | Broom finish and curing process | Decorative finish, sealer, or extended protection |
Contractors also use estimating tools to organize material, labor, and site variables. For general background on how AI helps contractors estimate costs, the important homeowner takeaway is simple: a transparent estimate still depends on accurate field measurements and a site inspection.
Before hiring a crew, verify:
- Insurance: Ask for current proof of coverage.
- Relevant experience: Request references for garage aprons, driveways, or concrete foundations in the region.
- Written scope: Confirm thickness, base preparation, reinforcement, joints, finish, and cleanup.
- Warranty language: Understand what the contractor covers for cracking, settlement, and workmanship.
- Weather planning: Make sure the schedule accounts for rain, temperature, and curing conditions.
A contractor who also handles excavation and foundation work can evaluate the apron as part of the surrounding structure rather than treating it as an isolated patch. Homeowners comparing concrete pouring services should look for that same connection between preparation, placement, and drainage.
Getting a Free Quote for a Concrete Garage Apron Near You
The most important choices are straightforward. Build the slab thick enough for the vehicle load, place it over a properly compacted base, isolate it from the garage floor where movement requires independence, and form the surface so water drains away from the door. Local rules may also control apron width, sidewalk transitions, curb connections, and the allowable grade. For example, one Illinois standard describes a garage-width apron extending up to 20 feet before tapering, with the grade from the garage floor toward the street staying within 2% to 8%, as shown in the Tinley Park construction standards.
Have a few details ready when you call:
- Approximate apron length and width
- Photos showing cracks, settlement, spalling, or joint separation
- The age and surface type of the existing driveway
- A description of where water pools after rain or snowmelt
- Any history of previous repairs or garage entry flooding
Those details help a contractor decide whether you need crack repair, base correction, concrete replacement, drainage work, or a combination. A free quote should turn the damage you're already seeing into a defined plan, not leave you with another vague recommendation.
Firm Foundations provides excavation, concrete foundations, garage slabs, driveway approaches, and concrete garage apron work for homeowners across Pennsylvania, Maryland, Delaware, and New Jersey. Visit Firm Foundations to request a free quote and discuss the right base, joint, slope, and finish for your garage entry.